Insert Screenshot
When creating presentations or other documents sometimes we need to insert an image of another open window or its crop part. In Windows, you can use Snipping Tool, which you already could read in the previous tutorial. In Microsoft Office there’s another way to insert the screenshot. Read in this manual, what needs to be done. If this guide has helped you, become a fan on Facebook and recommend this site to your friends, it can be useful for them too.
Insert screenshot
It does not matter if you’re working in Word, Excel and PowerPoint. Screenshot can be insert in all applications the same way, starting from version 2010. Just find the Insert tab and icon Insert screenshot, as shown below.
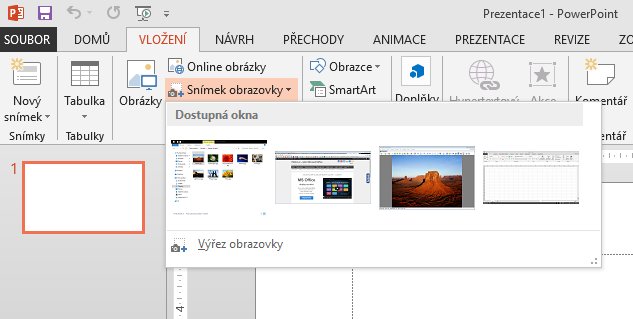
The menu shows other open windows from which after selecting directly create an image and insert it into the document. If you want to create a cutout window, activate the menu selection Screen clipping. The active window is minimized and it is now possible to perform a mouse selection of an area that we see. Upon completion of the selection image is inserted into the document again.
If we want to still perform additional crop of the screenshot, we can select it and on activated tab Format, find the Crop button, then moving black marks perform cropping.

2 komentáře
Dobrý den, výřez mě ale nejde vložit do emailu. Prosím jak na to? děkuji VK
Dobrý den, mělo by to jít zkopírovat ten označený výřez. Nebo si ho vložit do nějakého obrázkového programu, uložit jako soubor fotografie a tu dat do přílohy emailu.